IoT-Based Weather Monitoring System
Author: Vedant Kakuste • Publisher: Catalystech_hub • • Read: 5–7 min
Category: IoT Project
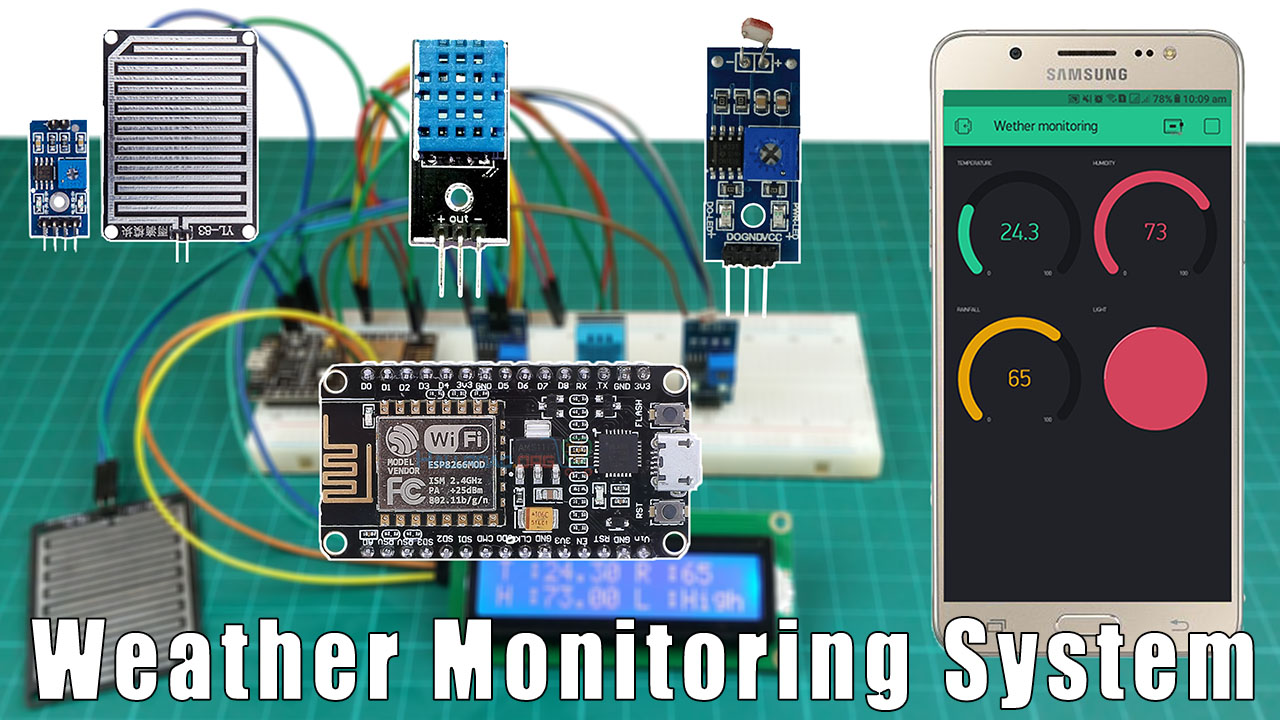
Learn how to build an IoT-based weather monitoring system that measures temperature, humidity, and atmospheric pressure and streams the data to a live dashboard. This project is ideal for college makers and Catalystech_hub mini-kits — easy to extend for smart agriculture and local weather stations.
🔧 Components Required
- ESP8266 (NodeMCU) or ESP32 board
- BMP280 or BME280 sensor (BME includes humidity)
- Jumper wires and breadboard
- USB cable and computer for programming
- Optional: Anemometer or rain sensor for extra readings
⚡ Wiring & Connections
Here’s a simple wiring guide for NodeMCU + BME280 using I2C:
- BME280 VIN → 3V3 (or VCC)
- BME280 GND → GND
- BME280 SCL → D1 (GPIO5)
- BME280 SDA → D2 (GPIO4)
_wOs3EsfOxq.png)
🧩 Software & Sample Code (ESP8266)
This starter sketch reads BME280 values and sends them to an MQTT broker (you can use Cloud MQTT, Mosquitto, or a local broker). Replace `WIFI_SSID`, `WIFI_PASS`, and `MQTT_SERVER` before uploading.
// IoT Weather Monitoring - ESP8266 (Arduino IDE)
#include
#include
#include
#include
#include

#define SEALEVELPRESSURE_HPA (1013.25)

const char* ssid = "WIFI_SSID";
const char* password = "WIFI_PASS";
const char* mqtt_server = "MQTT_SERVER";

Adafruit_BME280 bme; // I2C
WiFiClient espClient;
PubSubClient client(espClient);

void setup() {
  Serial.begin(115200);
  delay(100);
  if (!bme.begin(0x76)) { // try 0x76 or 0x77
    Serial.println("Could not find BME280 sensor!");
    while (1);
  }

  setup_wifi();
  client.setServer(mqtt_server, 1883);
}

void setup_wifi() {
  delay(10);
  Serial.printf("Connecting to %s\n", ssid);
  WiFi.begin(ssid, password);
  while (WiFi.status() != WL_CONNECTED) {
    delay(500);
    Serial.print(".");
  }
  Serial.println("\nWiFi connected: " + WiFi.localIP().toString());
}

void reconnect() {
  while (!client.connected()) {
    Serial.print("Attempting MQTT connection...");
    if (client.connect("ESPWeather-" + String(random(0, 9999)))) {
      Serial.println("connected");
    } else {
      Serial.print("failed, rc=");
      Serial.print(client.state());
      Serial.println(" try again in 5s");
      delay(5000);
    }
  }
}

void loop() {
  if (!client.connected()) reconnect();
  client.loop();

  float temperature = bme.readTemperature(); // °C
  float humidity = bme.readHumidity();       // %
  float pressure = bme.readPressure() / 100.0F; // hPa

  char payload[128];
  snprintf(payload, sizeof(payload), "{\"temp\":%.2f, \"hum\":%.2f, \"pres\":%.2f}", temperature, humidity, pressure);

  client.publish("catalystech/weather/1", payload);
  Serial.println(payload);

  delay(10000); // send every 10s
}
📊 Dashboard & Cloud
To visualize data in real time you can:
- Use Node-RED with an MQTT input and a dashboard node
- Use ThingSpeak or Adafruit IO — both accept MQTT/HTTP and provide charts
- Build a custom web dashboard with MQTT→Backend (Node.js) → WebSocket for live updates
🔒 Tips & Best Practices
- Use secure MQTT (TLS) or authenticated brokers for production deployments
- Calibrate sensors and average multiple readings to reduce noise
- Power the device with a stable 3.3V supply and protect it from rain if deployed outdoors
📎 Resources & Downloads
Get the schematics, fritzing file, and downloadable PDF guide here: Project Resources • IoT Weather
Related Posts
IoT-Based Weather Monitoring System
Author: Vedant Kakuste • Publisher: Catalystech_hub • • Read: 5–7 min
Category: IoT Project
Learn how to build an IoT-based weather monitoring system that measures temperature, humidity, and atmospheric pressure and streams the data to a live dashboard. This project is ideal for college makers and Catalystech_hub mini-kits — easy to extend for smart agriculture and local weather stations.
🔧 Components Required
- ESP8266 (NodeMCU) or ESP32 board
- BMP280 or BME280 sensor (BME includes humidity)
- Jumper wires and breadboard
- USB cable and computer for programming
- Optional: Anemometer or rain sensor for extra readings
⚡ Wiring & Connections
Here’s a simple wiring guide for NodeMCU + BME280 using I2C:
- BME280 VIN → 3V3 (or VCC)
- BME280 GND → GND
- BME280 SCL → D1 (GPIO5)
- BME280 SDA → D2 (GPIO4)
🧩 Software & Sample Code (ESP8266)
This starter sketch reads BME280 values and sends them to an MQTT broker (you can use Cloud MQTT, Mosquitto, or a local broker). Replace `WIFI_SSID`, `WIFI_PASS`, and `MQTT_SERVER` before uploading.
// IoT Weather Monitoring - ESP8266 (Arduino IDE)
#include
#include
#include
#include
#include

#define SEALEVELPRESSURE_HPA (1013.25)

const char* ssid = "WIFI_SSID";
const char* password = "WIFI_PASS";
const char* mqtt_server = "MQTT_SERVER";

Adafruit_BME280 bme; // I2C
WiFiClient espClient;
PubSubClient client(espClient);

void setup() {
  Serial.begin(115200);
  delay(100);
  if (!bme.begin(0x76)) { // try 0x76 or 0x77
    Serial.println("Could not find BME280 sensor!");
    while (1);
  }

  setup_wifi();
  client.setServer(mqtt_server, 1883);
}

void setup_wifi() {
  delay(10);
  Serial.printf("Connecting to %s\n", ssid);
  WiFi.begin(ssid, password);
  while (WiFi.status() != WL_CONNECTED) {
    delay(500);
    Serial.print(".");
  }
  Serial.println("\nWiFi connected: " + WiFi.localIP().toString());
}

void reconnect() {
  while (!client.connected()) {
    Serial.print("Attempting MQTT connection...");
    if (client.connect("ESPWeather-" + String(random(0, 9999)))) {
      Serial.println("connected");
    } else {
      Serial.print("failed, rc=");
      Serial.print(client.state());
      Serial.println(" try again in 5s");
      delay(5000);
    }
  }
}

void loop() {
  if (!client.connected()) reconnect();
  client.loop();

  float temperature = bme.readTemperature(); // °C
  float humidity = bme.readHumidity();       // %
  float pressure = bme.readPressure() / 100.0F; // hPa

  char payload[128];
  snprintf(payload, sizeof(payload), "{\"temp\":%.2f, \"hum\":%.2f, \"pres\":%.2f}", temperature, humidity, pressure);

  client.publish("catalystech/weather/1", payload);
  Serial.println(payload);

  delay(10000); // send every 10s
}
📊 Dashboard & Cloud
To visualize data in real time you can:
- Use Node-RED with an MQTT input and a dashboard node
- Use ThingSpeak or Adafruit IO — both accept MQTT/HTTP and provide charts
- Build a custom web dashboard with MQTT→Backend (Node.js) → WebSocket for live updates
🔒 Tips & Best Practices
- Use secure MQTT (TLS) or authenticated brokers for production deployments
- Calibrate sensors and average multiple readings to reduce noise
- Power the device with a stable 3.3V supply and protect it from rain if deployed outdoors
📎 Resources & Downloads
Get the schematics, fritzing file, and downloadable PDF guide here: Project Resources • IoT Weather